
Plan the trophy before the hunt begins.
The difference between a museum-quality mount and a ruined trophy is decided in the first few hours after the shot. Talk to us before you go — whether you're heading across the world or hunting just down the road in Wisconsin.
Preparation is preservation.
Most trophy damage happens before the animal ever reaches our studio. A few simple steps in the field protect decades of memory — and a single mistake can be impossible to reverse.
Avoid Costly Mistakes
Improper field dressing, poor cape cuts, or a delayed freeze can cost you the mount entirely. We'll show you how to handle the first hour right.
Prepare Your Animal
From shoulder mounts to full body work, every pose has its own field-prep requirements. Knowing in advance saves your taxidermist hours and saves you money.
USDA Bird Import
Bringing birds back from an international hunt? We're USDA-approved (W10015) for restricted avian imports and can walk you through every restriction before you book the trip.
Drop-Off Made Easy
Two full-service Wisconsin locations — in Jefferson and just outside Green Bay — both staffed by experienced taxidermists ready to receive your trophy.
Drop off where it's convenient.
Both studios handle whitetails, elk, exotics, fish, and birds. Same craftsmanship, same Stehling family standards — closer to home.
Jefferson, Wisconsin
New Franken (Green Bay)
Bringing birds back from abroad?
Restricted avian species — Mexico Goulds turkeys, Argentina ducks and doves, exotic upland birds — require a USDA-approved facility on the receiving end. Without one, customs has no choice but to hold or destroy the shipment.
Our W10015 designation lets us legally receive your birds, run them through the required quarantine and clearance, and move them straight into the studio. Talk to us before the hunt — we'll coordinate with your outfitter and shipping agent so the paperwork is right the first time.
Learn About USDA Bird Import →Hunting big game abroad?
African plains game, European reds, jungle cats, sheep, and other non-bird trophies don't go through our USDA bird facility — they move through standard wildlife import channels via your dip-and-pack provider, broker, and shipping agent.
We've received trophies from every continent for over fifty years and know the ropes. Call us before you book the hunt and we'll help you choose the right dip-and-pack, coordinate with your customs broker, and walk you through what your trophy will look like when it lands in Wisconsin so there are no surprises.
Plan an International Trophy →Asia · S. America
From the field to the freezer.
Step-by-step field handling written by Stehling's taxidermists, drawn from over 50 years of receiving trophies from every corner of the world. Read the section that matches your hunt — and call us with anything you're unsure about.
Whitetail, mule deer, elk, antelope
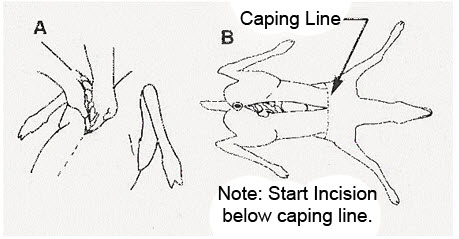
Caping for a Shoulder Mount
If there's any chance you'll want a shoulder mount, do not cut the throat or shoulders. The taxidermist needs that hide intact from well behind the front legs all the way up the neck.
- With the deer on its back, make a shallow cut through the skin just below the breastbone — well behind the brisket so you leave plenty of uncut hide for the shoulder mount.
- Insert two fingers under the skin to lift it away from the entrails, and ride the blade between them to avoid puncturing the gut (Figure A).
- Cut straight down the belly and around the genitals, slitting all the way to the pelvic bone.
- Cut carefully around the rectum without nicking the intestine. Pull it free, tie it off with string, and push it forward into the abdominal cavity.
- Roll the animal on its side to drain blood, then remove the entrails.

If You Want a Life-Size or Rug Mount
For full-body or rug work on bears, lions, and other big game, two skinning methods are used: the flat incision (best for rugs and a variety of life-size poses) and the dorsal method (a single cut down the back, used in specific cases only).
The flat incision follows the cut lines shown in Figure 1 — slits are made to free the feet from the carcass and the skin is pulled off whole. The head is detached as with a shoulder mount.
The dorsal method should only be used with prior approval and detailed instruction from your taxidermist. If in doubt, freeze the carcass whole and call us first.
If you can't deliver the hide right away, freeze it to your taxidermist's specifications — not just thrown in a bag.
Do
- Keep the cape cool and dry
- Use rubber or latex gloves throughout
- Tag every trophy before it leaves the field
- Photograph the animal in natural color immediately
Don't
- Cut the throat or front shoulders if you want a shoulder mount
- Cut the ears for attachment
- Drag the animal by the antlers across rough ground
- Leave the carcass in a warm vehicle
Fox, coyote, bobcat, fisher, marten
Handle Quickly — They Spoil Fast
Small mammals — especially carnivores — spoil quickly because of their thin hides and the bacteria they carry. Do not gut the animal. Get it to a taxidermist or a freezer as soon as possible.
- Let the carcass cool fully before bagging.
- Place the whole animal in a sealed plastic bag.
- Freeze it solid — the sooner the better.
- Bring it to us still frozen.
With the rabies present in many regions, take every safety precaution when handling small predators in the field.
Do
- Cool the carcass before bagging
- Freeze whole and intact
- Wear gloves at all times
- Bring it to us frozen
Don't
- Gut, skin, or salt small mammals yourself
- Leave the animal in a warm vehicle or trunk
- Wash or rinse the fur
- Handle without gloves — rabies risk is real
Turkey, waterfowl, upland, exotic species
Protect the Feathers Above All
The single most important thing with any bird mount is feather condition. Do not gut the bird. Rinse blood off the feathers with cool water, then get the bird to a taxidermist or a freezer immediately.
- Slide the bird carefully into a plastic bag, smoothing the feathers in the natural lay.
- Never bend or fold the tail feathers. If they don't fit, leave the tail sticking out and tie the bag loosely around the body.
- Freeze the bird solid in this position.
Federal protection notice: Songbirds, eagles, hawks, and owls are protected by U.S. federal law and cannot be mounted without a special federal permit.
Do
- Rinse blood from feathers with cool water
- Bag carefully, feathers in natural lay
- Freeze solid as soon as possible
- Bring legal tags with the bird
Don't
- Gut the bird
- Bend tail feathers to fit a bag
- Carry by the neck or feet
- Mount any federally protected species without a permit
Bass, walleye, musky, salmon, trout
Wet, Wrap, Freeze — and Photograph
Do not gut your fish. If you can't deliver it the same day, wrap the entire fish in a very wet towel and seal it inside a plastic bag, with all fins flat against the body to prevent breakage. Frozen this way, a fish can keep for months without losing reference quality.
Take a color photograph immediately at the catch. Fish lose their natural coloration within minutes of leaving the water — a clear photo at boatside is what allows our airbrush artists to recreate the exact color tones of your fish.
Do
- Photograph the fish immediately at the catch
- Wrap whole in a soaking-wet towel
- Lay all fins flat against the body
- Freeze flat in a sealed bag
Don't
- Gut, scale, or fillet the fish
- Bend or fold fins
- Let the fish dry out before freezing
- Skip the reference photo — color fades fast
Quick reference for every hunter.
Always bring the appropriate tags and licenses with your trophy when you drop it off.
Never cut the ears off any animal for attachment. They stay with the cape.
Songbirds, eagles, hawks, and owls are protected by federal law and cannot be mounted without a special permit.
Hunting somewhere remote with no taxidermist or freezer? Ask us about caping and salting techniques before you go — that's the only way to preserve a hide in the backcountry.
Wild game can transmit serious disease to humans. Always wear rubber or latex gloves when handling carcasses.
When in doubt, call us. A two-minute phone call before you cut can save your trophy.
Watch the technique.
Short demonstrations from the Stehling's team showing common field-care steps in real time.
Field Care Demonstration — Part 1
Field Care Demonstration — Part 2
Plan it right. Mount it forever.
One conversation before the trip can be the difference between a trophy you'll show off for fifty years and one we wish we could have saved. Reach out before you book the hunt — we're here for it.